OneClick Deployment
Deploy your applications and static websites directly from GitHub, GitLab, or Bitbucket using Nife OneClick Deployment.
Application Deployment
Step 1: Start Deployment
- Open the Deploy on Nife page.
- Paste your Git repository URL.
- Click Deploy Application.
Supported Git providers:
- GitHub
- GitLab
- Bitbucket

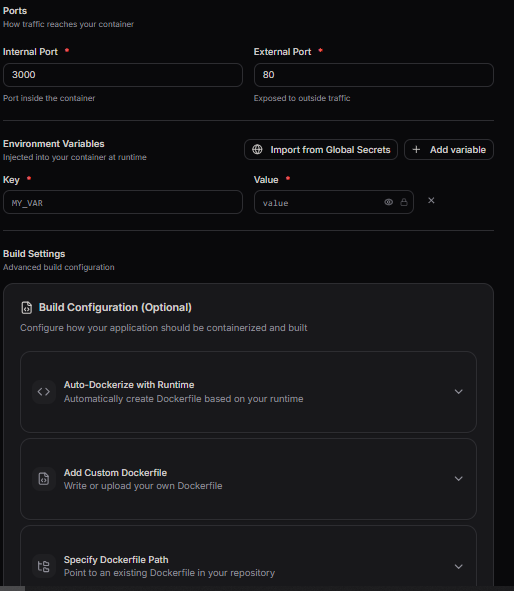
Step 2: Configure and Build Your Application
Configure your application before starting the build.
Provide the following details:
- Internal Port
- External Port
- Environment Variables
- Build Configuration (Optional)
Choose one of the available build configurations:
- Auto-Dockerize with Runtime – Automatically generates a Dockerfile based on the detected application runtime.
- Add Custom Dockerfile – Write or upload your own Dockerfile.
- Specify Dockerfile Path – Use an existing Dockerfile from your repository.
If no build configuration is selected, Nife automatically detects your application type and uses the Dockerfile in your repository root, or generates one if required.
Click Start Build.
After the build completes successfully, click Continue.
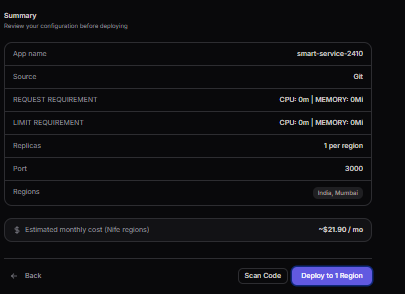
Step 3: Review and Deploy
Review the deployment summary.
Verify the following information:
- Application Name
- Repository
- CPU & Memory
- Replica Count
- Port Configuration
- Deployment Region
- Estimated Monthly Cost
Before deployment, Nife validates:
- Container Image
- Infrastructure as Code (IaC)
Click Deploy to Region.
Deployment Complete
Once the deployment is complete, your application is available with:
- Public URL
Your application has been successfully deployed.
Next Steps
After deployment, you can:
- Configure a custom domain.
- Monitor application logs and metrics.
- Set up GitHub Actions for automatic deployments.
- Scale your applications as needed.