Install Nife Monolith Agent on Standalone Servers
Learn how to install the Nife Monolith Agent on your standalone servers. This guide walks you through deploying applications on your own hardware using the BYOH (Bring Your Own Hardware) approach.
What is Monolith Agent?
The Nife Monolith Agent is a lightweight service that runs on your servers, allowing Nife to manage and monitor your applications. It enables you to use Nife's platform with your own infrastructure—bringing flexibility, control, and cost efficiency.
Key Benefits:
- Deploy applications on your own servers
- Full control over your infrastructure
- Use Nife's management and monitoring features
- Seamless integration with your existing hardware
- Support for multiple servers and scaling
Prerequisites
Before installing the Monolith Agent, ensure you have:
- A standalone server (physical or cloud-hosted)
- Supported OS: macOS, Linux, or Windows
- Root/Administrator Access Required:
- Linux:
sudoaccess or root user privileges (required for installation) - Windows: Administrator privileges (must run as Administrator)
- macOS: Administrator/sudo access
- Linux:
- Network connectivity to Nife API servers
- At least 2GB RAM and 10GB disk space
- Port 5050 available (default agent port)
Step 1: Download the Installer
The first step is downloading the Monolith Agent installer for your operating system.
Access the Installation Wizard
- Log in to launch.nife.io
- From the left navigation menu, go to Virtualmachines→ Standalone Servers
- Click Add Server button
- The installation wizard opens
Download for Your Operating System
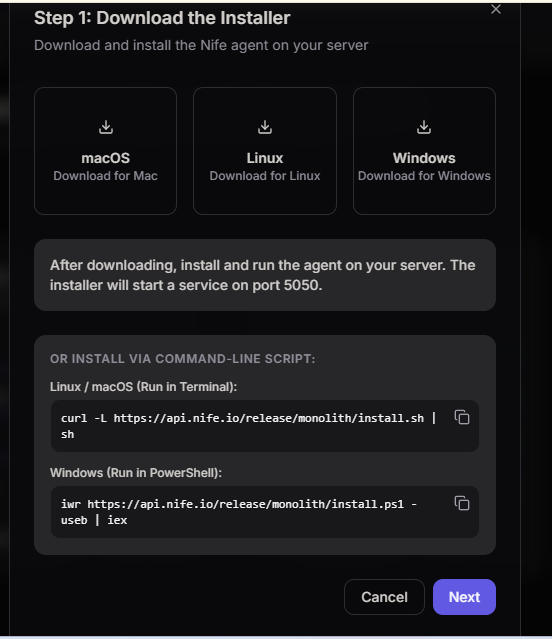
Choose your operating system:
For macOS:
# Download the macOS installer
# Run the downloaded .pkg file
# Follow the installation prompts
For Linux:
# IMPORTANT: Installation requires sudo access
# Download the Linux installer
# Install with sudo:
sudo bash ./monolith-agent-linux.sh

# Or use the command-line installation script with sudo:
curl -L https://api.nife.io/release/monolith/install.sh | sudo sh
⚠️ Note: Linux installation requires sudo privileges or root user access. You will be prompted for your password during installation.
For Windows:
# IMPORTANT: Run PowerShell as Administrator
# Right-click PowerShell icon and select "Run as Administrator"

# Download the Windows installer
# Double-click the .exe file to run as Administrator

# Or use the PowerShell installation script (as Administrator):
iwr https://api.nife.io/release/monolith/install.ps1 -useb | iex
⚠️ Critical: Windows installation requires Administrator privileges.
- Right-click PowerShell or Command Prompt
- Select "Run as Administrator"
- Run the installer script
If you try to install without Administrator rights, the installation will fail.
Installation Details
The installer will:
- ✅ Download the Monolith Agent binary
- ✅ Configure the system service
- ✅ Start the agent service on port 5050
- ✅ Enable automatic startup on server reboot
Installation Port: The agent runs on port 5050 by default and needs network connectivity to Nife API servers.
Step 2: Add Server IP Access
After the installer finishes, you need to register the server in Nife by providing its IP address and a name.
Server Registration Form
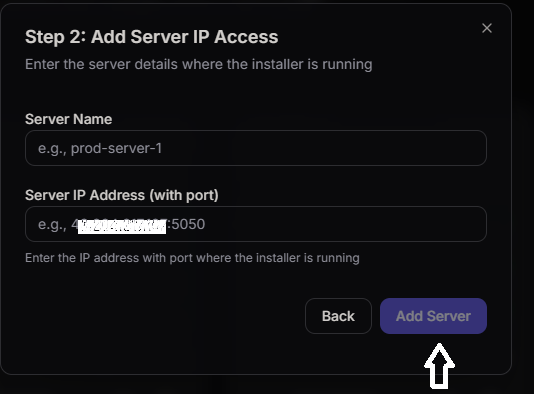
Fill in the following details:
Server Name
- Enter a descriptive name for your server (e.g.,
prod-server-1,api-host,web-01) - Use lowercase letters, numbers, and hyphens
- Make it meaningful for easy identification
- Example:
prod-server-1
Server IP Address (with port)
- Enter the IP address and port of your server
- Format:
IP:PORT(e.g.,43.204.217.109:5050) - Make sure port 5050 is accessible from the internet
- If using a different port, update accordingly
- Example:
43.204.217.109:5050
Steps to Add Server
- In the Standalone Server Management dashboard
- Click Add Server button
- Complete Step 1: Download the Installer (already done on your server)
- In Step 2: Add Server IP Access, enter:
- Server Name:
prod-server-1 - Server IP Address (with port):
43.204.217.109:5050
- Server Name:
- Click Add Server button
- Wait for connection verification
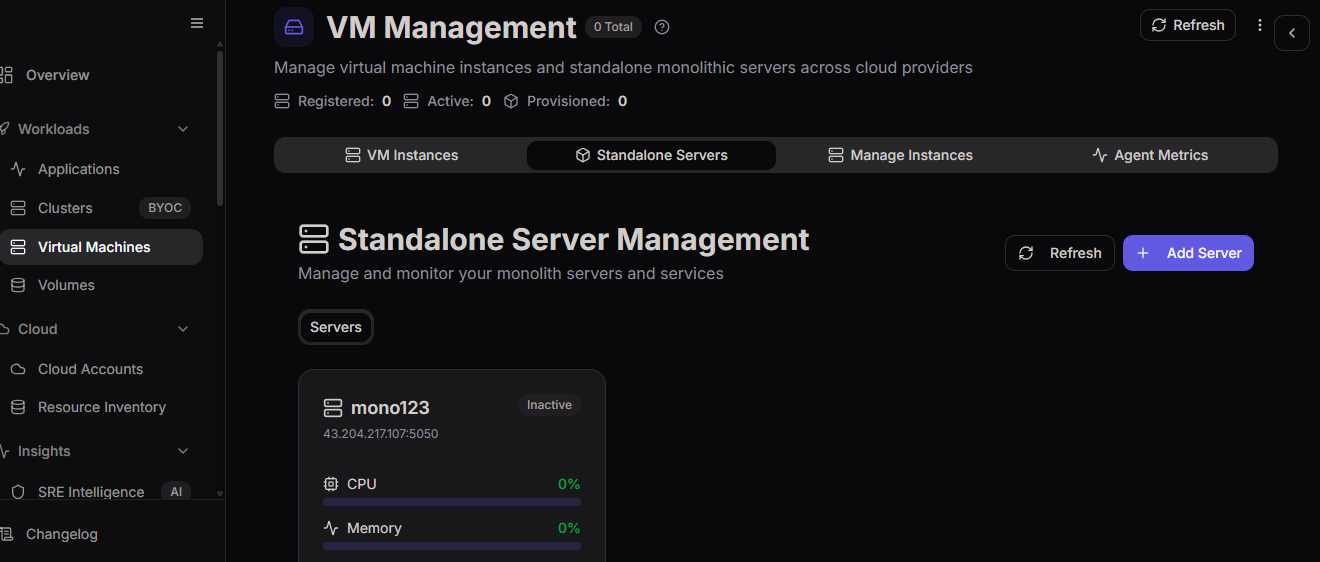
Step 3: Verify Server Connection
After adding the server details, Nife will attempt to connect to your server.
Connection Status
The dashboard shows server status:
- Active - Server is running and connected to Nife
- Inactive - Server is not reachable or agent is not running
- Offline - Server was previously connected but is now unreachable
Viewing Server Details
Once connected, you can:
- View Details - See server information, logs, and metrics
- Monitor Resources - Check CPU, Memory, and Disk usage
- Manage Services - Start, stop, and restart services
- View Metrics - Monitor performance and health
Server Information Displayed
- Server Name - Custom name you assigned
- IP Address - Server's IP and port
- Status - Connection status (Active/Inactive)
- CPU Usage - Percentage of CPU utilized
- Memory Usage - RAM consumption
- Disk Usage - Storage utilization
- Services - Running services count
- Last Updated - Last status check timestamp
Managing Your Standalone Servers
Dashboard Overview
The Standalone Server Management dashboard provides:
Server Cards - Each server shows:
- Server name and status
- IP address and port
- Real-time metrics (CPU, Memory, Disk)
- Service count
- Quick actions (View Details, Edit, Delete)
Quick Actions
- Refresh - Update all server statuses
- Add Server - Register a new server
- View Details - See full server information
- Edit - Modify server settings
- Delete - Remove server from Nife
Monitoring Server Health
- Check the dashboard regularly
- Monitor CPU, Memory, and Disk usage
- View logs for any issues
- Set up alerts for critical metrics
- Review service status
Scaling with Multiple Servers
You can register multiple servers:
- Repeat the installation process on each server
- Assign unique names to each server
- Monitor all servers from one dashboard
- Deploy applications across servers
- Load balance with multiple servers
Deploying Applications
Once your server is registered and active, you can deploy applications:
- Go to Applications
- Click Create New Application
- Select Standalone Server as deployment target
- Choose your server from the list
- Configure application settings
- Deploy your application
The agent will pull your code, build, and run your application on the server.
Best Practices
✅ Use Descriptive Names - Make server names clear and meaningful
✅ Monitor Regularly - Check server health and metrics frequently
✅ Keep Agent Updated - Update Monolith Agent periodically
✅ Secure Your Servers - Use strong firewall rules and security groups
✅ Backup Important Data - Implement regular backups
✅ Monitor Resources - Set up alerts for high CPU/Memory usage
✅ Plan Capacity - Ensure sufficient resources for your applications
✅ Document Setup - Keep records of your server configuration
✅ Use HTTPS - Enable SSL/TLS for secure communication
✅ Regular Updates - Keep OS and dependencies updated
Security Considerations
Firewall Configuration
Ensure proper firewall rules:
Allow Inbound:
- Port 5050 (Monolith Agent) from Nife API servers
- SSH/RDP for remote management (restrict to your IPs)
Allow Outbound:
- HTTPS (port 443) to Nife API servers
- Package managers (for application dependencies)
- Any ports your applications need
Network Security
- Use VPN or private networks if possible
- Implement IP whitelisting where applicable
- Use strong authentication for server access
- Regularly audit access logs
- Keep SSH keys secure
Agent Security
- The agent uses encrypted communication
- Authentication tokens are secure
- Regular security updates are released
- Monitor agent logs for suspicious activity
Advanced Configuration
Custom Port
To use a port other than 5050:
- During installation, specify custom port
- Update firewall rules for new port
- Update server IP in Nife dashboard with new port
- Example:
43.204.217.109:8050
High Availability Setup
For production deployments:
- Deploy agent on multiple servers
- Use load balancer in front of servers
- Monitor server health continuously
- Configure auto-restart policies
- Implement health checks
Scaling Considerations
- Monitor resource usage on each server
- Add new servers as load increases
- Distribute applications across servers
- Use load balancing for traffic distribution
- Plan for redundancy and failover
Support and Resources
Documentation:
Community:
Support:
- Support Portal
- Email: [email protected]
Conclusion
You've successfully installed the Nife Monolith Agent on your standalone server! You can now:
✅ Deploy applications to your own infrastructure
✅ Monitor server health and performance
✅ Manage multiple servers from one dashboard
✅ Leverage Nife's platform features on your hardware
For next steps:
- Deploy your first application
- Set up monitoring and alerts
- Configure additional servers
- Explore advanced features
Get started deploying now at launch.nife.io!
© Nife - Deploy anything, anywhere