Deploy Static Sites with GitHub Actions | Nife
Learn to deploy static sites using GitHub Actions with Nife. Automatically deploy your site on every push to GitHub with just 3 simple steps.
Overview
Setting up automated deployments for your static site on Nife takes just 3 steps:
- Deploy Your Site - Get your site live on Nife
- Setup GitHub CI/CD - Configure automatic deployments
- Verify & Monitor - Confirm everything is working
Let's get started!
Step 1: Deploy Your Site
Before setting up GitHub CI/CD automation, your site needs to be deployed to Nife for the first time.
Option A: Deploy Using Nife Dashboard
- Head to launch.nife.io and create an account (or log in).
- From the left navigation menu, go to Applications.
- Open the Sites tab.
- Click New Site.
- Provide your GitHub repository URL and select the branch you want to deploy.
- Configure your deployment settings, such as the framework, build requirements, install command, build command, and build output directory.
- If your repository is private, provide the required authentication details.
- Click Deploy Site
Your site is now live on Nife!
Option B: Deploy Using nifectl CLI
Run the deployment command:
nifectl site deploy
When prompted, provide:
- Site name - Name your static site
- Source code - Your GitHub repository URL (e.g.,
https://github.com/username/my-site) - Build directory - Where your built files are (e.g.,
dist/,build/,public/)
The CLI will automatically create your nife.toml configuration file and deploy your site.
What Happens Next
After deployment:
- ✅ Your site is live with a Nife URL
- ✅ A
nife.tomlconfiguration file is created - ✅ You're ready to set up GitHub CI/CD
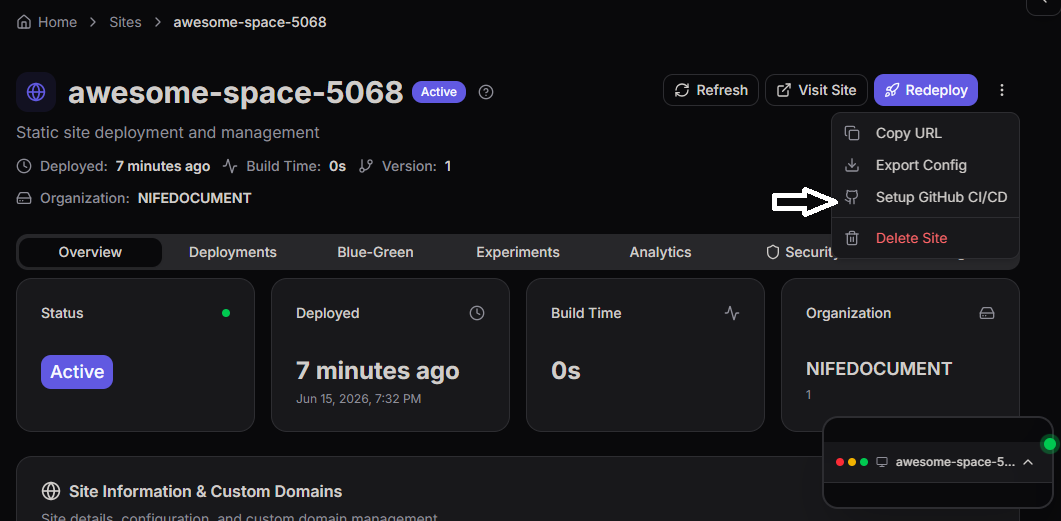
Step 2: Setup GitHub CI/CD
Now that your site is deployed, configure automatic deployments on every GitHub push using Nife Dashboard's guided setup.
Access CI/CD Setup in Nife Dashboard
- Log in to launch.nife.io
- Go to your Site
- Look for Setup GitHub CI/CD button
- Click it to open the guided setup
Follow the 3 Steps in Dashboard
The Nife Dashboard will guide you through 3 simple steps:
Step 1: Configure Workflow
- Download the GitHub Actions workflow template from the dashboard
- Or copy this workflow to your repository as
.github/workflows/deploy-site.yml:
name: Deploy Site to Nife
on:
push:
branches:
- main
- master
jobs:
deploy:
name: Deploy to Nife
runs-on: ubuntu-latest
steps:
- name: Checkout code
uses: actions/checkout@v2
- name: Deploy Site to Nife
env:
NIFE_ACCESS_TOKEN: ${{ secrets.NIFE_ACCESS_TOKEN }}
with:
args: "site redeploy --yes"
This workflow automatically deploys your site on every push to main or master branches.
Step 2: Download nife.toml

Before downloading, add your GitHub repository URL:
- In the dashboard, locate the Git URL input field
- Enter your GitHub repository URL:
https://github.com/your-org/your-repo
- The dashboard will auto-populate the
nife.tomlconfiguration with your git URL - Click Download nife.toml
- Save the file to your repository root
- Commit and push to GitHub:
git add nife.toml
git commit -m "Add Nife site configuration with GitHub URL"
git push
The nife.toml file now contains your site configuration with the git URL automatically set for deployments.
Step 3: Add Nife Access Token

- Generate an API token from the dashboard
- Add it as a GitHub Secret named
NIFE_ACCESS_TOKEN - The dashboard provides step-by-step instructions
Commit Everything to GitHub
Once you've completed all 3 steps, commit your changes:
git add .github/workflows/deploy-site.yml nife.toml
git commit -m "Setup Nife GitHub Actions CI/CD"
git push
GitHub Actions is now configured and ready to deploy automatically!
Step 3: Verify & Monitor
Test your setup and confirm everything works.
Trigger Your First Deployment
Make a test commit to trigger the workflow:
# Make a small change
echo "# Site updated" >> README.md

# Commit and push
git add README.md
git commit -m "test: verify GitHub Actions deployment"
git push
Monitor the Deployment
- Go to your GitHub repository
- Click Actions tab
- Watch your workflow run in real-time
- See deployment status and logs
Workflow should show:
- ✅ Checkout code - Success
- ✅ Deploy Site to Nife - Success
- 🟢 Workflow complete
Verify Site Updated
- Go to launch.nife.io
- Click on your Site
- View the live URL
- Check that your changes are live
Congratulations! Your site now deploys automatically on every push! 🎉
How It Works
Here's what happens when you push code:
1. You push to GitHub (main/master branch)
   ↓
2. GitHub Actions workflow triggers automatically
   ↓
3. Checkout your repository code
   ↓
4. Execute "site redeploy --yes" command
   ↓
5. Nife reads nife.toml configuration
   ↓
6. Pulls latest code from GitHub
   ↓
7. Runs build command (npm run build, etc.)
   ↓
8. Deploys built files to Nife
   ↓
9. Site is live with your changes (seconds later)
Supported Frameworks
Works with any framework that produces static files:
- React -
npm run build - Vue -
npm run build - Next.js -
npm run build - Astro -
npm run build - Jekyll -
jekyll build - Hugo -
hugo - Gatsby -
gatsby build - Eleventy -
eleventy - Svelte -
npm run build - Static HTML - No build needed
Troubleshooting
Workflow doesn't trigger
- Verify
.github/workflows/deploy-site.ymlexists - Check file is committed and pushed to GitHub
- Ensure workflow is on correct branch (
mainormaster)
"NIFE_ACCESS_TOKEN not found" error
- Go to GitHub Settings → Secrets and verify token exists
- If missing, add it again from Nife Dashboard
- Make sure secret name is exactly
NIFE_ACCESS_TOKEN
"Site not found" error
- Verify site exists in Nife Dashboard
- Check
nife.tomlis in repository root - Ensure site name in
nife.tomlmatches Nife Dashboard - Verify
git-urlpoints to correct GitHub repository
Site doesn't update after push
- Check GitHub Actions logs for errors
- Verify
git-urlandgit-branchin nife.toml are correct - Ensure build command works locally:
npm run build - Check that output directory matches
outputfield in nife.toml
Deployment timeout
- Check if site is very large
- Review GitHub Actions logs for details
- Increase timeout in workflow:
timeout-minutes: 15
Best Practices
✅ Keep nife.toml in Git - Version control your deployment configuration
✅ Use meaningful commits - Track what changed in each deployment
✅ Test locally first - Run build command before pushing
✅ Protect main branch - Require reviews before merging
✅ Monitor deployments - Check Actions tab after pushing
✅ Regenerate tokens - Update tokens every 30-60 days
✅ Use specific build commands - Ensure correct output
✅ Verify output directory - Match output field in nife.toml
Environment Variables
If your build needs environment variables:
- Go to GitHub repository Settings
- Secrets and variables → Actions
- Add variables like
REACT_APP_API_URL - Reference in your code normally
- GitHub Actions automatically includes them in deployments
Next Steps
Your static site is now set up for automated deployments! What's next?
- Deploy more frequently - Push updates without manual steps
- Add environment variables - Store secrets securely
- Scale to multiple sites - Deploy multiple sites with Nife
- Monitor performance - Use Nife dashboard to track metrics
- Set up alerts - Get notified of deployment issues
More Resources
- Nife Documentation
- GitHub Actions Documentation
- Nife CLI Site Reference
- Static Site Deployment Guide
© Nife - Deploy anything, anywhere