Managing VM Instances | Nife
This guide covers all operations to manage your virtual machine instances in Nife, including the VM Management dashboard, instance lifecycle operations, and monitoring.
VM Management Dashboard
The VM Management dashboard provides a unified interface for viewing and controlling all your VM instances across cloud providers.
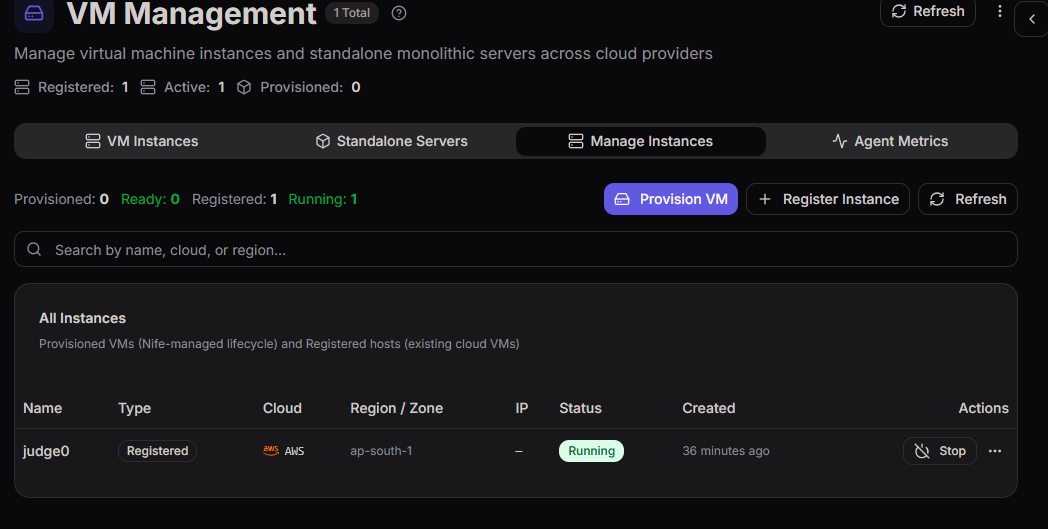 VM Management dashboard showing VM Instances tab with all provisioned VMs
Dashboard Overview
Top Section
- Title: "VM Management" with total instance count
- Description: "Manage virtual machine instances and standalone monolithic servers across cloud providers"
- Refresh Button: Manually refresh the instance list
Statistics Bar
- Registered: Number of instances registered in Nife
- Active: Number of currently active/running instances
- Provisioned: Total number of provisioned instances
Navigation Tabs
The dashboard has four main tabs for different views:
1. VM Instances (Default Tab)
View all provisioned VM instances managed through Nife. Shows:
- Instance name, type, cloud provider, region/zone
- IP addresses (Public and Private)
- Current status (Running, Terminated, etc.)
- Creation timestamp
- Action menu for each instance
2. Standalone Servers
View all Standalone nodes running Kubernetes. Shows:
- K3s server instances
- Cluster information
- Node status
- Workload deployment targets
3. Manage Instances
View and manage active instances with advanced controls:
- Start, stop, restart operations
- Configure instance settings
- Access console and SSH
- Manage snapshots
- Monitor performance metrics
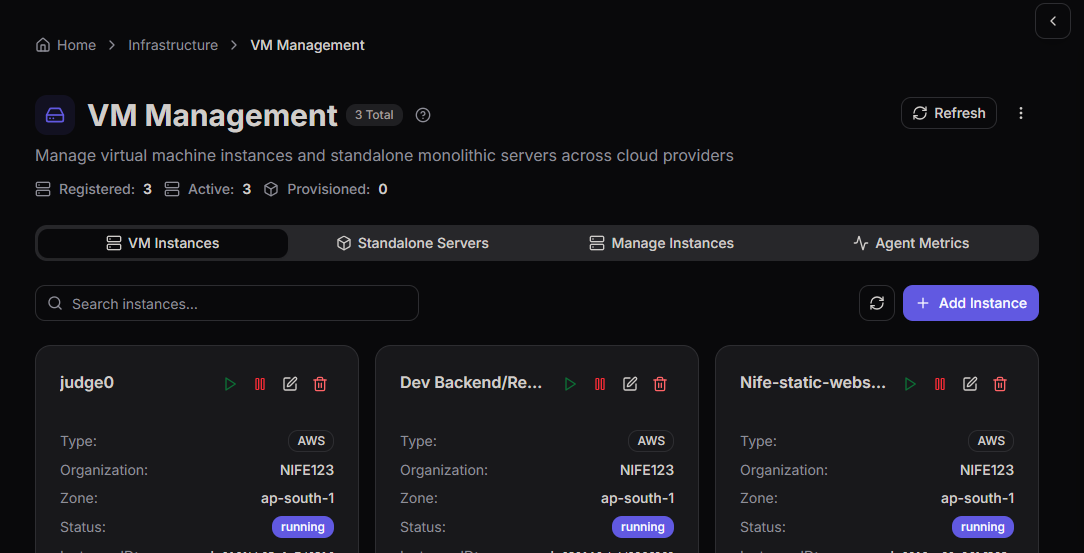 Manage Instances tab showing table view with detailed instance information and action controls
4. Agent Metrics
Monitor agent performance and health across all instances:
- Agent status and heartbeat
- Performance metrics
- Connection status
- Resource utilization
Action Buttons
Top-Right Button Group:
- Provision VM: Create a new VM instance (blue button with icon)
- Register Instance: Register an existing VM as a Nife instance
- Refresh: Manually refresh the dashboard
Instance Display
The main VM Instances tab displays all instances in a card-based grid view for easy scanning and management.
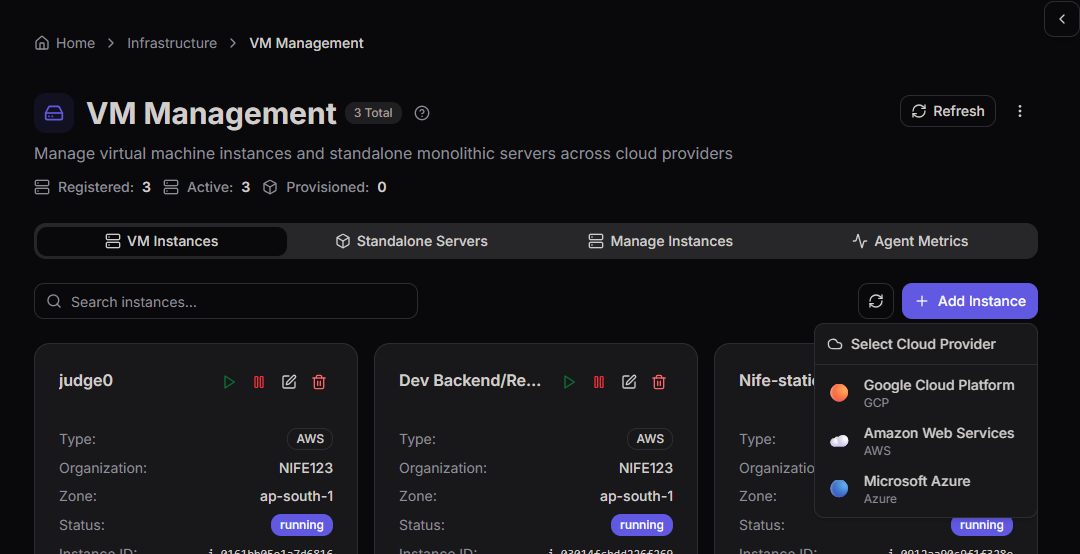 Instance card-based grid showing running instances with quick action icons
Instance Card Layout
Card Header
- Instance Name: Displayed prominently at the top
- User-defined during provisioning or registration
- Examples:
judge0,Dev Backend/Re...,Nife-static-webs...
- Status Indicator: Colored dot next to the name
- Green = Running
- Blue = Provisioning
- Orange = Bootstrapping
- Red = Terminated/Error
Card Information Section
Type
- Deployment mode (Standalone or Monolith)
- Shown as a label on the card
Cloud Provider
- Cloud provider hosting the instance
- Shows:
AWS,GCP, orAzure - Badge format with provider name
Organization
- Organization that owns the instance
- Examples:
NIFE123,production-team - Determines access control and permissions
Zone / Region
- Deployment location on the cloud provider
- AWS examples:
ap-south-1,us-east-1a - GCP examples:
us-central1-a - Azure examples:
East US
Status Badge
- Current operational state
- Displays as colored badge:
- running (green)
- stopped (gray)
- provisioning (blue)
- bootstrapping (orange)
- ready (green with checkmark)
- terminated (red)
Card Action Icons
Each card includes quick action icons:
- Play Icon: Start a stopped instance
- Stop Icon: Stop a running instance
- Edit Icon: Edit instance configuration
- Delete Icon: Delete the instance (with confirmation)
Additional Information
- Click on the card to expand and see full details
- View public and private IP addresses
- See creation timestamp and agent status
- Access full action menu for advanced operations
Search and Filter
Search Bar
- Placeholder: "Search by name, cloud, or region..."
- Type to search across all instances
- Real-time results update
- Searches: Name, Type, Cloud provider, Region/Zone
Examples:
- Search "aws" to find AWS instances
- Search "test" to find instances with "test" in name
- Search "ap-south" to find instances in specific region
Instance Status Types
Running
- Instance is active and operational
- Green status indicator
- Services and agents are running
- Full operations available: stop, restart, configure, console, SSH, snapshots, monitoring
Terminated
- Instance has been deleted or stopped permanently
- Red/Gray status indicator
- No operations available
- Cannot be restarted (must provision new instance)
- Shown in historical data
Provisioning
- Instance is being created on cloud provider
- Blue status indicator
- Initial stage after Provision VM is clicked
- Page refreshes automatically to show progress
- Typically takes 1-2 minutes
Bootstrapping
- VM is created, now installing Nife agent
- Orange status indicator
- Cloud-init is running on the instance
- Installation in progress (takes 3-8 minutes)
- Page auto-refreshes every 6 seconds
Ready
- Instance is fully provisioned and agent is connected
- Green status indicator with checkmark
- All services are operational
- Full operations available
- Instance ready for workload deployment
Registering Existing Cloud Hosts
In addition to provisioning new VMs through Nife, you can register existing VM instances from your cloud providers. This allows you to manage already-running instances from AWS, GCP, or Azure within Nife.
Registering an Existing Host
Access Registration:
- Navigate to the VM Management dashboard
- Click the Register Instance button (next to "Provision VM")
- Select your cloud provider:
- Register existing AWS host - For EC2 instances
- Register existing GCP host - For Compute Engine instances
- Register existing Azure host - For Azure VMs
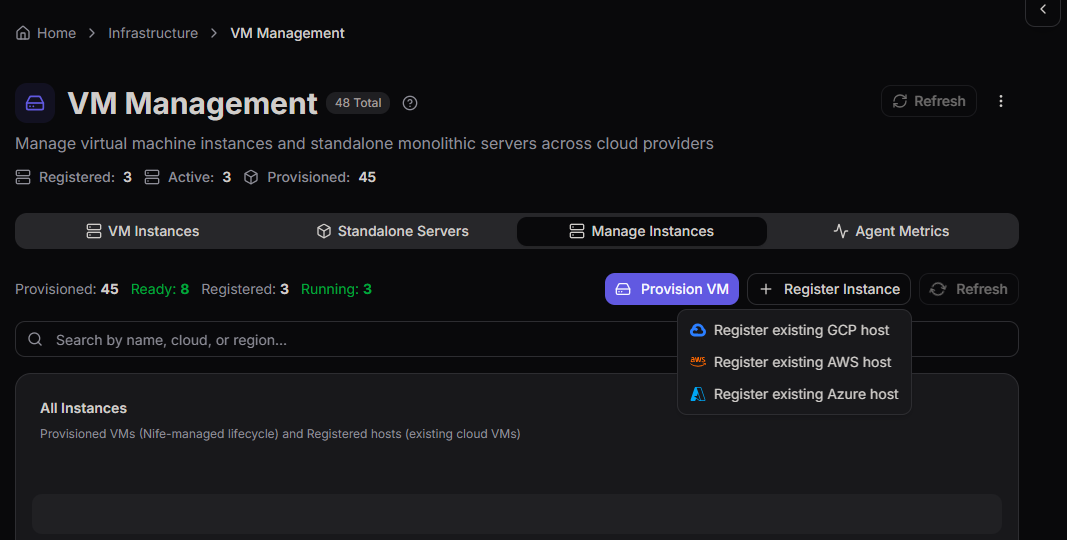 Register Instance dropdown showing cloud provider options: GCP, AWS, and Azure
Register AWS Host Dialog
When registering an existing AWS EC2 instance, complete the following fields:
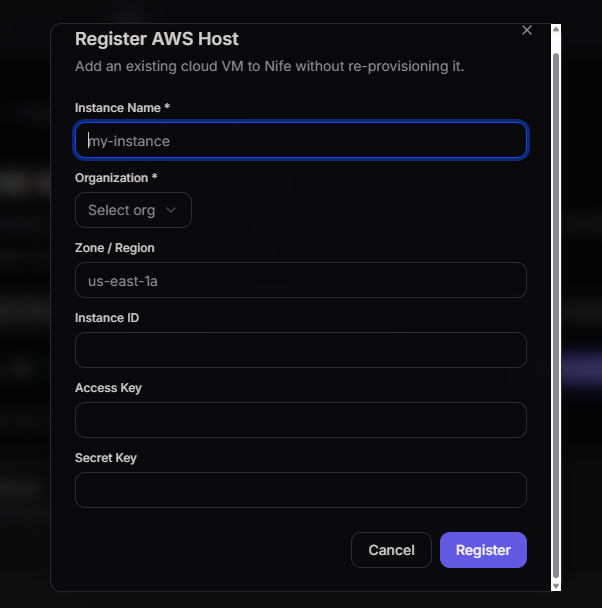 Register AWS Host dialog for adding existing EC2 instances
Instance Name *
- The name you want to give this instance in Nife
- Example:
my-instance,web-server-01 - This is how the instance will appear in your dashboard
- Can be changed later in instance settings
Organization *
- Select the organization this instance belongs to
- Dropdown menu with available organizations
- Determines access control and resource allocation
- Required field
Zone / Region
- AWS region where the instance is running
- Example:
us-east-1a,ap-south-1,eu-west-1 - Pre-populated with default region if available
- Must match the actual region of your instance
Instance ID
- The EC2 instance ID from AWS console
- Format:
i-0123456789abcdef0 - Found in AWS EC2 dashboard under "Instances"
- Required to identify the exact instance
Access Key
- AWS IAM access key ID
- Format:
AKIA...(20 characters) - Generated in AWS IAM console
- Used for authentication
- Should have permissions for EC2 management
Secret Key
- AWS IAM secret access key
- Keep this confidential
- Generated in AWS IAM console alongside Access Key
- Used with Access Key for secure authentication
- Cannot be retrieved after creation - store safely
Registration Steps:
- Fill in all required fields (*)
- Verify information is correct
- Click Register button
- Instance is added to your Nife dashboard
- Status will show as "Running" if the instance is active on AWS
- Agent installation begins automatically
Make sure your AWS IAM credentials have the following permissions:
ec2:DescribeInstancesec2:DescribeInstanceStatusec2:StartInstancesec2:StopInstancesec2:RebootInstances
Register GCP Host Dialog
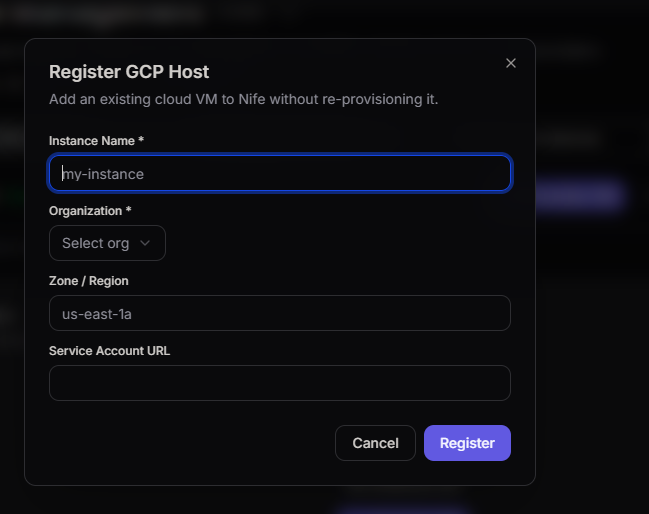
When registering an existing GCP Compute Engine instance:
 Register GCP Host dialog for adding existing Compute Engine instances
- Click Register Instance -> Register existing GCP host
- Fill in the following fields:
- Instance Name: Display name in Nife
- Organization: Select organization
- Zone / Region: GCP zone (e.g.,
us-central1-a) - Instance ID: GCP instance name or ID
- Service Account Key: JSON service account key from GCP
- Click Register to add the instance
Obtain your GCP service account key from Google Cloud Console:
- Go to IAM & Admin → Service Accounts
- Create or select a service account
- Create a JSON key
- Paste the key contents in the registration form
Register Azure Host Dialog
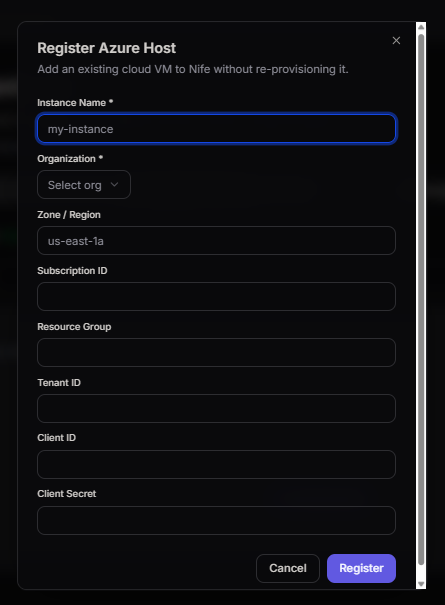
When registering an existing Azure VM:
 Register Azure Host dialog for adding existing Azure VMs
- Click Register Instance -> Register existing Azure host
- Fill in the following fields:
- Instance Name: Display name in Nife
- Organization: Select organization
- Zone / Region: Azure region (e.g.,
East US) - Instance ID: Azure resource ID or VM name
- Subscription ID: Your Azure subscription ID
- Credentials: Azure credentials or managed identity
- Click Register to complete
Ensure your Azure service principal has these permissions:
- Virtual Machine Contributor
- Reader (for viewing resources)
Installing Nife VM Agent
After registering an existing instance, you need to install the Nife VM Agent on the registered server. This agent enables Nife to monitor metrics, manage the instance, and execute operations.
Agent Installation Overview
The Nife VM Agent is a lightweight monitoring and management daemon that:
- Collects real-time metrics (CPU, Memory, Disk, Network, Processes)
- Communicates instance health status back to Nife
- Enables remote management and monitoring capabilities
- Runs securely with encrypted communication
Prerequisites for Installation
Before installing the agent, ensure:
- SSH Access: You can SSH into the registered instance
- Sudo Privileges: The user can run sudo commands without password prompt (or with password)
- Internet Connection: Instance can reach
https://api.nife.io - Supported OS: Linux-based instance (Ubuntu, CentOS, Debian, etc.)
- Bash Shell: Bash is available on the instance
Installation Steps
Step 1: Access Your Instance
SSH into your registered instance:
ssh -i <your-ssh-key> <username>@<public-ip>
Example:
ssh -i nife-key.pem ubuntu@13.206.69.58
Step 2: Run the Installation Command
Once logged in via SSH, execute the Nife VM Agent installation script. Use the command provided in your Nife dashboard for your specific instance:
curl -fsSL https://api.nife.io/release/vm-agent/install.sh | sudo bash -s -- \
  --node_id <your-node-id> \
  --org_id <your-org-id> \
  --auth_token <your-auth-token> \
  --endpoint https://api.nife.io \
  --mode vm
Step 3: Wait for Installation to Complete
The installation script will:
- Download the Nife VM Agent binary
- Install system dependencies
- Create a systemd service for the agent
- Start the agent service
- Register with the Nife backend
Installation typically takes 2-5 minutes.
Step 4: Verify Installation
Check that the agent is running:
systemctl status nife-vm-agent
You should see output like:
● nife-vm-agent.service - Nife VM Agent
   Loaded: loaded (/etc/systemd/system/nife-vm-agent.service; enabled; vendor preset: enabled)
   Active: active (running) since [timestamp]
   Main PID: XXXX
Step 5: Check Dashboard Status
After installation:
- Return to your Nife dashboard
- Go to VM Management -> VM Instances (or Manage Instances)
- Find your instance
- Status should show as Ready with a green indicator
- Click on the instance to view metrics
Step 6: View Agent Metrics
To view live metrics from your registered instance:
- Go to VM Management -> Agent Metrics tab
- You'll see all instances (both registered and created) with live telemetry
- Metrics auto-refresh every 30 seconds
- Click on an instance card to view detailed metrics
- Metrics include CPU, Memory, Disk, and running processes
Agent Metrics Display
Once the agent is installed and connected, you can view real-time metrics from your instance.
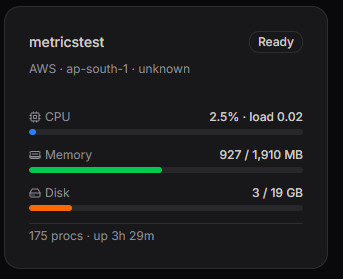 Nife VM Agent metrics showing CPU usage, memory consumption, disk space, and process count
Metrics Available
The Nife VM Agent collects and displays:
| Metric | Description | Unit |
|---|---|---|
| CPU | Current CPU utilization | % and load average |
| Memory | RAM usage and total available | MB / GB |
| Disk | Storage space used and available | GB |
| Processes | Number of running processes and uptime | count / time |
| Network | Network throughput (optional) | Mbps |
| Docker Stats | Docker container metrics (if Docker running) | various |
Uninstalling the Agent
If you need to uninstall the Nife VM Agent:
sudo systemctl stop nife-vm-agent
sudo systemctl disable nife-vm-agent
sudo rm -rf /opt/nife-vm-agent
sudo rm /etc/systemd/system/nife-vm-agent.service
sudo systemctl daemon-reload
Troubleshooting Agent Installation
Installation Failed
- Check internet connectivity:
curl -I https://api.nife.io - Verify SSH access and sudo permissions
- Ensure bash is available:
which bash - Check disk space:
df -h
Agent Not Running
# Check service status
systemctl status nife-vm-agent

# Check logs
journalctl -u nife-vm-agent -n 50

# Restart agent
sudo systemctl restart nife-vm-agent
Metrics Not Showing in Dashboard
- Wait 2-3 minutes for initial metrics to appear
- Verify agent is running:
systemctl status nife-vm-agent - Check network connectivity from instance to Nife API
- Verify auth token in the installation command is correct
- Check firewall rules allow outbound HTTPS to
api.nife.io:443
Connection Error
- Verify the instance has internet access
- Check firewall rules (Security Groups on AWS/Azure, Firewall on GCP)
- Ensure API URL is correct:
https://api.nife.io - Verify the auth token hasn't expired
Instance Operations
Starting an Instance
Start a previously stopped instance to resume operations.
From the Table Row:
- Locate the stopped instance in the table
- Click the action menu (three dots) at the end of the row
- Select Start from the menu
- Confirmation dialog appears
- Click Confirm to start
- Instance status changes to Running
You can only start instances that are currently in Stopped or Ready status with no active operations.
Stopping an Instance
Gracefully shut down a running instance to save resources.
From the Table Row:
- Locate the running instance in the table
- Click the action menu (three dots) at the end of the row
- Select Stop from the menu
- Confirmation dialog appears
- Click Confirm to stop
- Instance transitions to Stopped status
Stopping an instance will halt all running services. Ensure no critical workloads are active.
Restarting an Instance
Restart an instance to reload services and clear memory.
From the Table Row:
- Locate the instance in the table
- Click the action menu (three dots)
- Select Restart from the menu
- Confirmation appears
- Click Confirm to restart
- Instance briefly shows restarting status, then returns to Running
When to Restart:
- After configuration changes
- To clear memory issues
- When services become unresponsive
- After security patches
- During troubleshooting
Configuring Instance
Access and modify instance settings and configuration.
From the Table Row:
- Click the action menu (three dots) for the instance
- Select Configure
- Configuration panel opens
- Adjust settings as needed:
- Resource allocation
- Network settings
- Storage options
- Performance tuning
- Save changes
Accessing Instance Console
Get browser-based terminal access to your instance for direct command execution.
From the Table Row:
- Click the action menu (three dots)
- Select Console
- Browser console opens
- Execute commands directly on the instance
- Full terminal access available
SSH Access
Connect securely via SSH using your SSH key.
From the Table Row:
- Click the action menu (three dots)
- Select SSH
- SSH connection details are displayed
- Copy the SSH command
- Paste into your terminal
- Connect with your SSH key
SSH Command Format:
ssh -i <your-ssh-key> <username>@<public-ip>
Example:
ssh -i nife-key.pem ubuntu@13.206.69.58
Creating Snapshots
Create point-in-time backups of your instance for recovery and cloning.
From the Table Row:
- Click the action menu (three dots)
- Select Snapshots
- Snapshot management panel opens
- View existing snapshots with creation dates
- Click Create Snapshot to backup current state
- Snapshot creation begins
- Use snapshots to:
- Backup instance state
- Clone instances
- Restore to previous states
- Create images for scaling
Monitoring Instance Performance
Monitor real-time and historical performance metrics.
From the Table Row:
- Click the action menu (three dots)
- Select Monitoring
- Performance metrics dashboard opens
- View metrics over different time ranges (1h, 24h, 7d, 30d)
Available Metrics:
- CPU Utilization: Percentage of CPU resources used
- Memory Usage: RAM consumption in GB
- Network Throughput: Data transfer rate in Mbps
- Disk I/O: Read/write operations per second
- Disk Usage: Storage space utilization
Deleting VM Instances
Before Deletion
PERMANENT ACTION: Deleting a VM instance permanently removes it from Nife and your cloud provider. All data will be lost unless backed up. This action cannot be undone.
Before deleting, ensure:
- Backup Important Data: Create snapshots if data needs recovery
- No Active Workloads: Ensure no services depend on this instance
- Severed Dependencies: Disconnect load balancers and databases
- Final Confirmation: You want to permanently delete this instance
Deletion Process
From the Table Row:
- Locate the instance to delete
- Click the action menu (three dots)
- Select Delete
- Confirmation dialog appears with warning
- Review instance name and warning message
- Click Confirm Delete
- Instance begins termination process
Deletion Timeline:
- Immediately: Instance stops accepting new connections
- 1-2 seconds: Instance is shut down
- 5-10 seconds: Cloud resources are released
- 15-30 seconds: Instance disappears from dashboard
- Billing: Stops immediately upon deletion
After Deletion
Once deleted:
- Instance is removed from cloud provider
- All resources are released
- Billing charges stop
- Instance no longer appears in dashboard
- Only recoverable through snapshots (if created)
Bulk Operations
Searching Instances
Find specific instances quickly using the search bar.
Search Examples:
- By Name: Type instance name (e.g., "ingress")
- By Cloud: Type provider name (e.g., "aws", "gcp")
- By Region: Type region/zone (e.g., "ap-south-1")
- By Type: Type instance type (e.g., "standalone", "monolith")
Search Tips:
- Search is case-insensitive
- Partial matches are supported
- Results update in real-time
- Clear search with the X button
Exporting Instance Data
Export your VM inventory for reporting, analysis, or backup.
Export Process:
- Click Export button (if available)
- Choose export format:
- CSV: Spreadsheet format for Excel
- JSON: Structured data format for systems
- File downloads with columns:
- Instance Name
- Type (Standalone, Monolith)
- Cloud Provider
- Region/Zone
- IP Address
- Status
- Organization
- Creation Date
- Instance ID
Refreshing the Dashboard
Update the instance list to see latest changes.
Manual Refresh:
- Click the Refresh button in top-right
- Dashboard updates with latest data
- Shows newly provisioned instances
- Updates status of all instances
- Refreshes metrics and timestamps
Auto-Refresh Behavior:
- Dashboard auto-refreshes during provisioning
- Updates every 6 seconds during agent bootstrapping
- Manual refresh always available
Instance Lifecycle
Complete Instance Lifecycle
1. Provision VM
   ↓
2. Provisioning (1-2 min)
   ↓
3. Bootstrapping (3-8 min)
   ↓
4. Ready (Operational)
   ↓
5. Running (Active workloads)
   ↓
6. Stop / Pause (Optional)
   ↓
7. Restart / Resume
   ↓
8. Delete (Final)
State Transitions
- Provision VM → Provisioning: Cloud VM is being created
- Provisioning → Bootstrapping: VM created, agent installation starting
- Bootstrapping → Ready: Agent installation complete, services running
- Ready → Running: Workloads deployed and executing
- Running → Stopped: Instance gracefully shut down
- Stopped → Running: Instance restarted
- Any State → Deleted: Instance terminated (permanent)
Keyboard Shortcuts
- Escape: Close menus and dialogs
- Ctrl/Cmd + F: Focus search field
- Enter: Submit search or confirm actions
Troubleshooting
Instance Status Not Updating
- Click Refresh button to manually update
- Wait 30 seconds and refresh again
- Check cloud provider console for actual status
- Verify network connectivity
- Check for error messages in Actions panel
Cannot Perform Operations
- Verify instance is in appropriate status (Running, Ready, Stopped)
- Check that no other operations are in progress
- Verify your Nife account has organization permissions
- Try refreshing the dashboard
- Attempt operation again
Instance Appears Stuck in Provisioning
- Refresh the dashboard to check for status updates
- Check cloud provider console for instance status
- If stuck for >15 minutes, may need to delete and reprovision
- Contact Nife support if issue persists
Cannot Delete Instance
- Verify instance is not actively running workloads
- Check organization permissions
- Ensure no other operations are pending
- Try from cloud provider console as backup
- Contact support if deletion repeatedly fails
Best Practices
- Naming: Use consistent, descriptive naming conventions
- Monitoring: Check performance metrics regularly
- Backups: Create snapshots before major changes
- Cleanup: Delete unused instances to manage costs
- Organization: Organize instances by purpose and environment
- Documentation: Document instance purposes and configurations
- Security: Keep instances patched and updated
- Cost Management: Monitor instance costs and resource utilization
Next Steps
- Monitoring VM Performance - Detailed performance monitoring
- Creating VM Instances - Create new instances
- Cloud Provider Setup - Provider-specific configuration
- Troubleshooting - Common issues and solutions