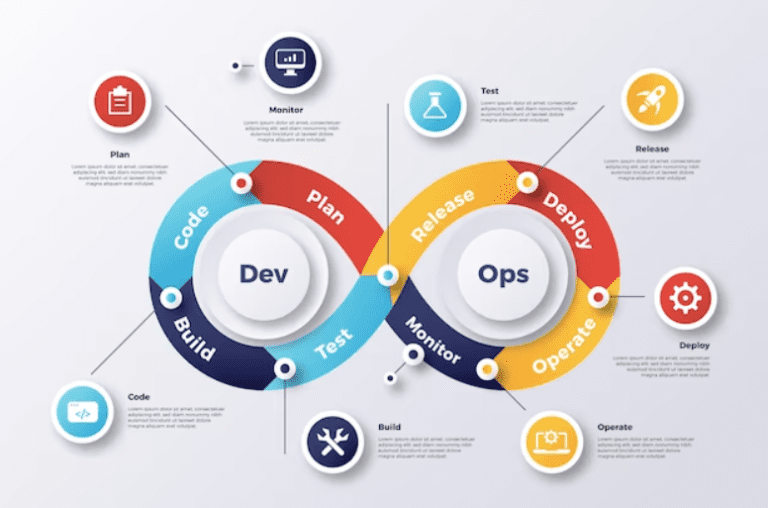
3 posts tagged with "devops pipeline"

View All Tags

Launching Your Kubernetes Cluster with Deployment: Deployment in K8s for DevOps

In this article, we'll be exploring deployment in Kubernetes (k8s). The first step will be to dive deep into some basic concepts related to deployment, followed by a deeper dive into the deployment process.

Let's get some basics straight.

What is Deployment in Kubernetes (k8s)?#

cloud gaming services

In Kubernetes, deployment is a high-level resource object that manages application deployment. It ensures applications are in the desired state all the time. It enables you to define and update the desired state of your application, including the number of replicas it should be running on. It also handles updates and rollbacks seamlessly.

To get a better understanding of deployment in Kubernetes let's explore some key aspects.

Replica Sets: Behind the scenes, deployment creates and manages replica sets. Replica sets ensure that the desired number of pods are available all the time. If for some reason a pod gets deleted, it gets replaced by a new one by a replica set.

Declarative Configuration: The desired state of your applications is defined in a declarative manner in deployment. This is done using YAML or JSON files. In these files, you specify information like the number of replicas, deployment strategies, and container image.

Scaling: You can control the scaling of your application from deployment configuration. You can scale it up or down whenever needed. When you change the configuration Kubernetes automatically adds or removes pods.

Version Management: With deployments, you can easily keep track of different versions of your applications. As soon as you make any changes a new version is created. This practice helps you roll back to the previous version anytime in case of any problems.

Self-Healing: The deployment controller automatically detects faulty pods and replaces them to ensure proper functioning.

All the above aspects of Kubernetes deployments make them a crucial tool for DevOps. Now that you've understood the concept of Kubernetes deployment. It's time to get your hands dirty with the practical aspect of deployment.

Hands-On Deployment:#

We've already discussed the importance of declarative configuration. Let's explore how you can create a Kubernetes deployment YAML file. This file is essential for defining the desired state of the application in the cluster.

Specifying Containers and Pods:#

When creating a YAML file you'll have to specify everything related to your application. Let's break it down.

apiVersion and kind: The first step is to specify the API version and application kind. You can do that using apps/v1 and Deployment.

Metadata: It is the name and label you specify for your deployment. Make sure to make it unique with your Kubernetes cluster.

Specs: Now this is the part in the file where you set the desired state of your application.

  • Replicas: This is where you specify the desired number of replicas you want to run your application on. For example, by setting replicas:5 you can create 5 identical pods.
  • Selector: This is where you match the deployment with the pods it manages. You can do that through labels. Define a selector with match labels to select pods based on labels.
  • Template: This is where you define the structure of pods.
  • Metadata: This is where labels are defined to specify the pods controlled by this deployment
  • Spec: In this section, you define containers that make up your application. In this section, you define the name of the container, the image to use, the ports to expose, the environment variable, and the CPU memory usage limit.

Strategy: This is the section where you can define the update strategy for the deployment. If you want to lower the risk of downtime you can specify a rolling update strategy. You can use maxUnavailable and maxSurge to specify how many pods you want during an update.

Deploying your Application:#

cloud application deployment

After the creation of the YAML file, it's time to use it in your Kubernetes cluster for deployment. Let's take a deep dive into the deployment process.

You can deploy your application to the Kubernetes cluster using the kubectl apply command. Here is a step-by-step guide.

Run kubectl apply -f deployment.yaml. This command will instruct Kubernetes to create or update resources defined in the YAML file. Kubernetes will act on the information in the file and will create the mentioned number of pods with the defined configurations.

Once you've used the command you can validate it with Kubectl get pods. This command will give you real-time information about the creation of pods and their state. It gives valuable information about your application deployment.

It's crucial to monitor the deployment progress to ensure proper functioning. For this purpose, you can run commands like kubectl rollout status. This command gives you information about the update status if you've configured your deployment for updates. It provides you with real-time information about the pods successfully rolled out.

There is always room for error. In case you find any errors during monitoring you can inspect individual pods using kubectl describe pod and kubectl logs commands.

That's all for today. Hope this guide helps you increase your proficiency in using Kubernetes as a DevOps tool. If you like this story give us a clap and follow our account for more amazing content like this. We'll be back with new content soon.

Exploring The Power of Serverless Architecture in Cloud Computing

Lately, there's been a lot of talk about "serverless computing" in the computer industry. It's a cool new concept. Through this, programmers focus on coding without worrying about the technical stuff underneath. It's great for businesses and developers. It can adapt to their needs and save money. Research says the serverless computing industry will grow significantly, with a projected value of \$36.84 billion by 2028.

In this article, we'll explain what serverless computing is, talk about its benefits, and see how it can change software development in the future. It's a fun and exciting topic to explore!

Understanding the term “Serverless Computing”#

Serverless computing is a way of developing and deploying applications that eliminate the need for developers to worry about server management. In traditional cloud computing, developers must manage their applications' server infrastructure. But in serverless computing, the cloud management platform handles managing the infrastructure. This allows developers to focus on creating and launching their software without the burden of server setup and maintenance.

serverless computing

In a similar vein, Kubernetes simplifies robust distributed applications by combining modern container technology and Kubernetes. Kubernetes enables autoscaling, automatic failover, and resource management automation through deployment patterns and APIs. Though some infrastructure management is necessary, combining "serverless" and "Kubernetes" may seem counterintuitive.

Critical Components of Serverless Computing#

Several fundamental components of serverless architecture provide a streamlined and scalable environment for app development and deployment. Let's analyze these vital components in further detail:

Function as a Service (FaaS):#

Functions as a Service is the basic concept behind serverless cloud computing. FaaS allows its users to generate functions that may be executed independently and carry out specific tasks or procedures. The cloud service takes care of processing and scaling for these procedures when triggered by events or requests. With FaaS, Cloud DevOps don't need to worry about the underlying infrastructure, so they can concentrate on building code for particular tasks.

Event Sources and Triggers:#

In serverless computing, events are like triggers that make functions run. Many different things can cause events, like when people do something, when files are uploaded, or when databases are updated. These events can make tasks happen when certain conditions are met. It's like having a signal that tells the functions to start working.

Event-driven architecture is a big part of serverless computing. It helps create applications that can adapt and grow easily. They can quickly respond to what's going on around them. It's like having a super-intelligent system that knows exactly when to do things.

Cloud Provider Infrastructure:#

cloud management platform

Cloud management platforms are responsible for maintaining the necessary hardware to make serverless computing work. The cloud service handles server management, network configuration, and resource allocation so that developers may concentrate on creating their applications. Each cloud management platform has a unique architecture and set of services regarding serverless computing. This comprises the compute operating configurations, the automated scaling techniques, and the event handling mechanisms.

Function Runtime Environment:#

The function runtime environment is where the cloud management platform executes serverless functions. It is equipped with all the necessary tools, files, and references to ensure the smooth running of the function code. The running context supports many programming languages, allowing developers to create methods in the language of their choice. A cloud service handles the whole lifecycle of these operational settings. This involves increasing capacity and adding more resources as required.

Developer Tools and SDKs:#

Cloud providers are like helpful friends to developers when making and launching serverless applications. They offer unique tools and software development kits (SDKs) that make things easier. With these tools, developers can test their code, fix issues, automate the release process, and track how things are going. It's like having a magic toolbox that helps them do their work smoothly.

SDKs are like secret codes that help developers work with the serverless platform. They make it easy to use its services and APIs. They also help developers connect with other services, manage authentication, and access different resources in the cloud. It's like having a unique guidebook that shows them the way.

Service Integration:#

Serverless computing platforms offer a plethora of pre-built features and interfaces that developers can take advantage of. These include databases, storage systems, message queues, authorization and security systems, machine learning services, etc. Leveraging these services eliminates the need to build everything from scratch when implementing new application features. By utilizing these pre-existing services, Cloud DevOps can harness their capabilities to enhance the core business operations of their applications.

Monitoring and Logging:#

Cloud DevOps may monitor the operation and behavior of their functions using the built-in monitoring and logging features of serverless platforms. Processing times, resource consumption, error rates, and other metrics are all easily accessible with the help of these instruments. Cloud DevOps may identify slow spots by monitoring and recording data, enhancing their operations, and addressing issues. These systems often integrate with third-party monitoring and logging services to round out the picture of an application's health and performance.

With this knowledge, developers can harness the potential of serverless architecture to create applications that are flexible, cost-effective, and responsive to changes. Each component contributes to the overall efficiency and scalability of the architecture, simplifies the development process, and ensures the proper execution and management of serverless functions.

Advantages of Serverless Computing#

serverless architecture

There are several advantages to serverless computing for organizations and developers.

Reduced Infrastructure Management:#

Serverless architecture or computing eliminates the need for developers to handle servers, storage, and networking.

Reduced Costs:#

Serverless computing reduces expenses by charging customers only for the resources they consume. Companies may be able to save a lot of money.

Improved Scalability:#

With serverless computing, applications may grow autonomously in response to user demand. This can enhance performance and mitigate downtime during high use.

Faster Time to Market:#

Serverless computing accelerates time to market. It allows developers to focus on their application's core functionality.

Disadvantages of Serverless Computing#

There are several downsides to serverless computing despite its advantages.

Data Shipping Architecture:#

The Data Shipping Architecture is different from how serverless computing usually works. In serverless computing, we try to keep computations and data together in one place. But with the Data Shipping Architecture, we don't do that. Because serverless computing is unpredictable, it's not always possible to have computations and data in the same location.

This means that much data must be moved over the network, which can slow down the program. It's like constantly transferring data between different places, which can affect the program's speed.

No Concept of State:#

Since there is no "state" in serverless computing, data accessible to multiple processes must be kept in some central location. However, this causes a large number of database calls. This can harm performance. Basic memory read and write operations are transformed into database I/O operations.

Limited Execution Duration:#

Currently, there is a fixed length limit for serverless operations. Although this is not an issue at the core of serverless computing, it does limit the types of applications that may be run using a serverless architecture.

Conclusion#

Serverless computing saves money, so it will keep growing. That's why we must change how we develop applications and products to include serverless computing. We should consider how to use it to make applications work better, cost less, and handle more users. When we plan, we need to think about the good and bad parts of serverless computing. If we use serverless computing, we can stay up-to-date with technology and strengthen our market position. You can also streamline distributed applications with Serverless Kubernetes. Serverless Kubernetes is a powerful combination of container technology and Kubernetes.

You can also experience the power of cloud hosting with Nife to upgrade your website today.

How to Set Up a DevOps Pipeline Using Popular Tools like Jenkins and GitHub

Setup a DevOps pipeline using popular tools like Jenkins, GitHub#

Continuous Integration and Continuous Delivery, or CI/CD for short, is a comprehensive DevOps method that focuses on the creation of a mix that is compatible with the process of software development and the process of software operation. Improving ROI may be accomplished via the use of automated updates and the automation of procedures. Developing a CI/CD pipeline is the linchpin of the DevOps paradigm. This implementation makes the process of bringing a product to market far more efficient than it was previously possible.

How to Use GitHub Actions to Construct a CI/CD Pipeline#

Before we dive in, here are a few quick notes:

It is important to clearly understand what a CI/CD pipeline is and what it should perform. This is only a quick remark, but it's essential. When your code is modified, a continuous integration pipeline will run to ensure that all of your changes are compatible with the rest of the code before it is merged. In addition to this, it should build your code, perform tests, and validate that it works properly. The produced code is then sent into production via a CD pipeline, which takes the process one step further.

GitHub Actions take a choose-your-own-adventure-style approach to continuous integration and continuous delivery. You will be presented with this message when you launch GitHub Actions for the first time in a repository. You have access to a plethora of guided alternatives that come with pre-built CI processes that you may exploit following the specifications of your technology. On the other hand, if you want to, you may construct your CI process from the ground up.

Key advantages of using GitHub Actions for CI/CD pipelines#

!](./img/wp-content-uploads-2023-03-Advantages-of-using-GitHub-Actions-300x198.png)

Advantages of using GitHub Actions

But before we get into that, let's take a moment to review a few of the advantages of using GitHub Actions; after all, quite a few different solutions are now available. Permit me to break out the following four major advantages that I've found:

CI/CD pipeline setup is simple:#

Because developers built GitHub Actions specifically for developers, you won't need specialized resources to establish and manage your pipeline. There is no need to set up CI/CD since it is unnecessary manually. You won't need to install webhooks, acquire hardware, reserve certain instances elsewhere, keep them updated, apply security updates, or spool down idle machines. You need to add one file to your repository for it to be functional.

Respond to any webhook on GitHub:#

You can use any webhook as an event trigger for an automation or CI/CD pipeline since GitHub Actions is completely linked. This covers things like pull requests, bugs, and comments. Still, it also includes webhooks from any application that you have linked to your GitHub repository. Let's imagine you've decided to run a portion of your development pipeline using any of the numerous tools now available on the market. With GitHub Actions, you can initiate CI/CD processes and pipelines of webhooks from these applications (even something as basic as a chat app message, provided, of course, that you have connected your chat app to your GitHub repository).

Community-powered, reusable workflows:#

You can make your workflows public and accessible to the larger GitHub community, or you may browse the GitHub Marketplace for pre-built CI/CD workflows (there are more than 11,000 actions available!). Did I mention that every action is reusable? All you have to do is reference its name. That is correct as well.

Support for any platform, language, and cloud:#

Actions on GitHub are compatible with any platform, language, or cloud environment without restriction. That indicates that you can utilize it with any technology you choose.

Steps to setup DevOps Pipeline#

DevOps Pipeline

In this article, we'll walk through the steps to set up a DevOps pipeline using popular tools like Jenkins and GitHub.

Step 1: Set up a version control system#

Installing and configuring a version control system (VCS) to store and administer the application's source code is the first stage in establishing a DevOps pipeline. GitHub is one of the most widely used version control systems (VCS) solutions. It allows users to save and share code in a repository that is hosted in the cloud. Create an account on GitHub and follow the on-screen directions to set up a new repository. This may be done by clicking here.

Step 2: Set up a build tool#

Next, you must configure a build tool to compile, test, and package your code automatically. This will take you to the next phase. Jenkins is an open-source automation server with hundreds of plugins to automate different phases of the software development lifecycle. It is one of the most common build tools and one of the most used tools overall. Download Jenkins, then install it on a server or cloud instance. Once that's done, follow the on-screen directions to configure it after setting it up.

Step 3: Configure your pipeline#

After installing and configuring your build tool and version control system, the following step is to set up and configure your pipeline. Your application's construction, testing, and deployment may all be automated via a pipeline consisting of a sequence of phases. A Jenkinsfile is a text file that explains the steps of your pipeline. You may use Jenkins to establish a pipeline; the file you use to do so is called a Jenkins file. Your application's construction, testing, packaging, and deployment may be stages. You can use plugins to automate the process.

Step 4: Add testing and quality checks#

It is essential to include testing and quality checks into your pipeline if you want to guarantee the satisfactory performance of your application. Automating unit, integration, and end-to-end tests may be accomplished with a wide range of testing frameworks and tools. In addition, you may check for problems with the code's quality and security by using tools that analyze static code. You may incorporate third-party tools into your pipeline or use one of the numerous plugins included with Jenkins for testing and quality checks.

Step 5: Deploy your application#

Deploying your application to a production environment should be the last step in your DevOps pipeline. To automate the deployment process and guarantee consistency in various contexts, you may use applications such as Ansible, Docker, and Kubernetes. You may also track the performance of your application by using monitoring tools, which will allow you to spot any problems that may emerge.

Conclusion#

In conclusion, establishing a DevOps pipeline via the use of well-known technologies such as Jenkins and GitHub may assist in the process of software development life cycle streamlining, hence enhancing both the rate at which software is delivered and its overall quality. You may improve the quality of your application's development as well as the productivity of your development team by automating the processes of developing, testing, and deploying your application.